How to Reduce Windows Startup Time: 10 Proven Ways to Make Your PC Boot Faster
Author: hasanuzzaman
Published in: Operating System

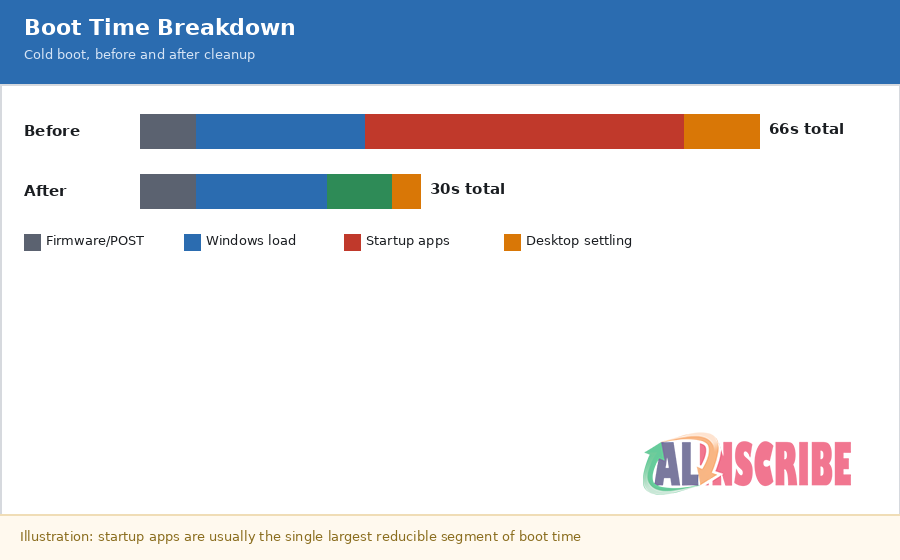
A PC that takes over a minute to become usable after pressing the power button has almost always accumulated the same handful of problems: too many apps launching at once, a few background services nobody remembers installing, and settings left at their factory defaults. Learning how to reduce Windows startup time is less about deep technical work and more about clearing out a backlog that built up gradually, one installed app at a time.
The fixes below are ordered from the highest-impact, lowest-effort changes to the ones worth trying only if the basics do not fully solve it. Most people see the biggest improvement from the very first one.
1. Disable High-Impact Startup Apps
This is consistently the single biggest cause of slow boots. Every application that registers itself to launch at sign-in adds to the time before the PC actually feels ready to use, and many apps enable this during installation without asking.
How to Check and Disable Them
Press Ctrl+Shift+Esc to open Task Manager, then click the Startup apps tab (called Startup in older versions). Click the Startup impact column header to sort, and work through everything marked High or Medium. Right-click each one and choose Disable. Leave essential items alone, such as your antivirus, audio drivers, and GPU software; when in doubt, disable one item at a time and reboot to confirm nothing important broke.
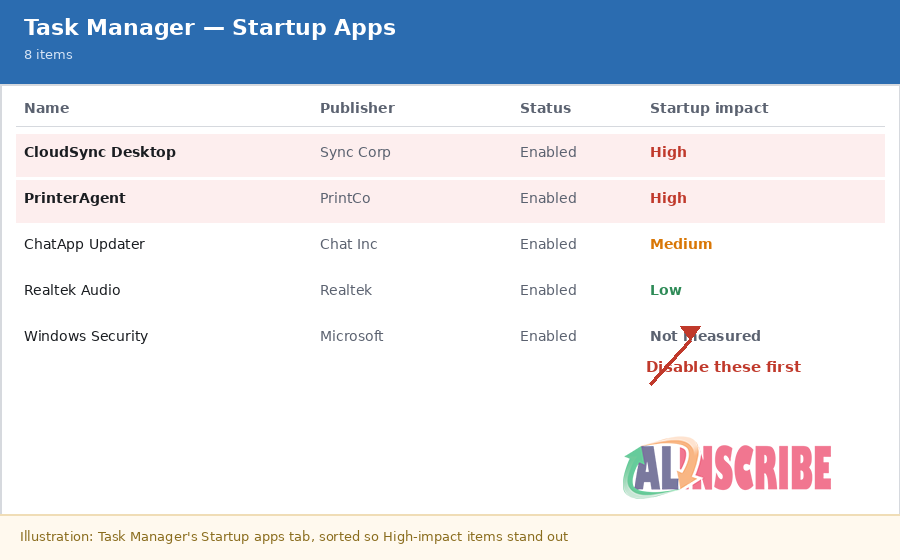
Disabling a startup app does not uninstall it. You are only stopping it from launching automatically, and it can be re-enabled in seconds if something stops working.
The same list is reachable from Settings, then Apps, then Startup, on both Windows 10 and 11, where each item has a simple on/off toggle instead of a right-click menu.
2. Enable Fast Startup
Fast Startup is a hybrid shutdown mode that saves the core of the Windows kernel to a file on shutdown, similar to hibernation, so the next boot can restore from that file instead of loading everything from scratch. On many systems it noticeably cuts cold boot time.
How to Turn It On?
Open Control Panel, go to Power Options, then Choose what the power buttons do, then click Change settings that are currently unavailable. Check Turn on fast startup (recommended), then Save Changes. Fast Startup requires hibernation to be enabled; if the option is missing, run powercfg /hibernate on from an administrator Command Prompt first, then repeat the steps above.
Flow Chart: Control Panel → Power Options → Choose What the Power Buttons Do → Change Settings → Check Fast Startup
When to Leave It Off?
Dual-boot systems, certain BIOS firmware updates, and some driver installations behave unpredictably with Fast Startup enabled, because the Windows partition stays in a partially locked state rather than fully shutting down. If you dual-boot with Linux or regularly flash firmware, leave it off and rely on the other fixes on this list instead.
3. Move Windows to an SSD
This is the single most transformative hardware change available. A traditional hard drive relies on a spinning platter and a physical read head, both far slower than solid-state storage at reading the many small files Windows needs during boot. Moving the operating system from a hard drive to an SSD, particularly an NVMe drive on modern hardware, commonly turns a boot that takes minutes into one that takes seconds.
If replacing the drive is not practical, most manufacturers offer free cloning software that copies the existing Windows installation onto a new SSD without a full reinstall. This is worth doing before any other hardware upgrade, since it affects every other task on the PC, not just startup.
4. Check and Optimize SSD Health
An SSD that is nearly full runs measurably slower than the same drive with room to spare, because flash storage needs free space to manage writes efficiently; a drive at 90% capacity can run 20 to 40% slower than the same model at 70%. Keeping at least 10 to 15% of the drive free helps maintain consistent performance, boot included.
Run TRIM
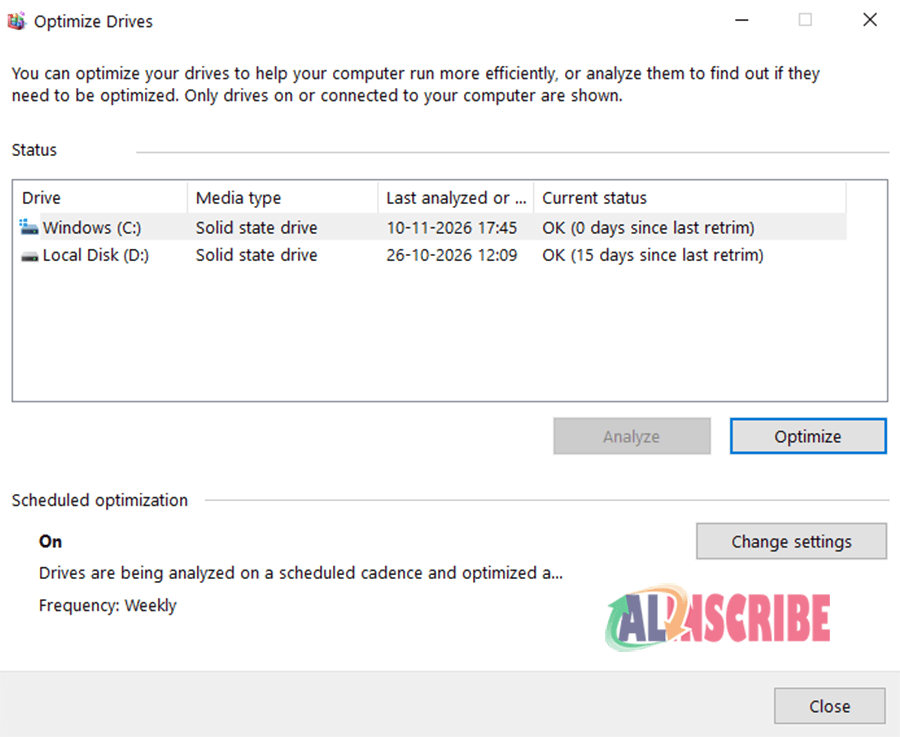
Windows includes a built-in optimizer that runs TRIM on SSDs, which is safe and different from the defragmentation used on hard drives. Open Control Panel, then System and Security, then Administrative Tools, then Defragment and Optimize Drives, select the SSD, and click Optimize. The same tool reports when TRIM last ran, so you can confirm it is happening on a regular schedule rather than assuming it is.
Flow Chart: Control Panel → System and Security → Administrative Tools → Defragment and Optimize Drives
5. Disable Unnecessary Background Services
Beyond startup apps, Windows and third-party software register background services that start automatically and keep running the entire session, some of which are rarely needed on a typical home PC. Disabling the ones you do not use frees up resources during the exact window when the system is already busiest.
This step carries more risk than trimming startup apps, since some services support core Windows features. Only disable services you specifically recognize as unnecessary, such as a printer service for a printer you no longer own, and avoid touching anything related to networking, security, or Windows Update unless you are certain what it does.
6. Check BIOS or UEFI Boot Settings
Before Windows even begins loading, the motherboard firmware runs its own startup checks, and a few settings there affect total boot time. Restart the PC and enter BIOS or UEFI setup, usually by pressing Delete, F2, or F10 during the very first moment of startup, depending on the manufacturer.
Two Settings Worth Checking
Boot Order: Confirm the SSD or hard drive with Windows installed is listed first, so the firmware is not wasting time checking other drives or a network boot option first.
Fast Boot or Quick Boot: Many motherboards include their own hardware-level fast boot option, separate from Windows' Fast Startup, that skips redundant hardware checks. Disable Quick Boot checks specifically for an optical drive if you no longer use one.
7. Reduce the Boot Menu Timeout
If the PC pauses on a boot menu or an operating system selection screen, even for a system with only one operating system installed, that pause is pure wasted time. This setting is normally reachable through System Configuration: press Windows+R, type msconfig, go to the Boot tab, and reduce the timeout value, or set it to the minimum if only one OS entry is listed.
Flow Chart: Windows+R → type msconfig → Boot Tab → Timeout
8. Update Storage Drivers and Firmware
Outdated storage controller drivers or SSD firmware can quietly slow down disk access during boot, even when nothing else appears wrong. Check the SSD manufacturer's own utility, such as Samsung Magician or Crucial Storage Executive, for firmware updates, and check Windows Update or the motherboard manufacturer's site for the latest chipset and storage drivers. This is a low-effort check worth doing once every few months, since drive firmware updates are infrequent but occasionally fix measurable performance regressions.
9. Adjust Visual Effects and Transparency
On weaker or older graphics hardware, some of the visual polish Windows applies while the desktop loads, such as transparency and animations, can add a small delay to how quickly the system feels ready. Open Settings, then Accessibility, then Visual effects, and turn off Transparency effects. For more control, search for "Adjust the appearance and performance of Windows" and choose Adjust for best performance, or selectively keep only the effects you care about.
10. Run a Clean Boot to Isolate a Stubborn Problem
If startup is still slow after all of the above, a clean boot helps identify exactly what is responsible. Open System Configuration (msconfig), go to the Services tab, check Hide all Microsoft services, then click Disable all. Go to the Startup tab, open Task Manager from there, and disable every remaining item. Restart and time the boot. If it is now fast, re-enable services and startup apps in small groups, rebooting between each batch, until the slow one reappears.
Flow Chart: Windows+R → type msconfig → Services Tab → (check) Hide all Microsoft services → Disable all → Startup Tab → Task Manager → Disable Item
A Quick-Start Checklist
Open Task Manager's Startup apps tab and disable everything marked High or Medium impact that you do not need.
Enable Fast Startup in Power Options, unless you dual-boot or regularly flash firmware.
Confirm the SSD has at least 10-15% free space, and run TRIM through Optimize Drives.
Check BIOS boot order and enable Fast Boot if your motherboard offers it.
If you are still on a hard drive, moving to an SSD will outperform every software fix combined.
The Bottom Line
Most guides on how to reduce Windows startup time boil down to the same short list, and the order matters: trimming startup apps and enabling Fast Startup cost nothing and take a few minutes, while moving to an SSD is the one hardware change that outperforms every software tweak combined. Work through the list in order, reboot after each change to see what actually helped, and a boot that once took over a minute can often drop to well under thirty seconds without spending anything at all.
Sources
XDA Developers — 11 ways to improve Windows boot time for quicker startup
MakeUseOf — You should disable Fast Startup but do this to keep your boot fast anyways
Technobezz — Windows 11 Slow Startup and Long Boot Time? 11 Ways to Fix It
SoftOrbits — How to Make Windows Startup Faster: 12 Proven Methods
SageTweaks — How to Speed Up Windows 11 Boot Time: 7 Proven Fixes
Windows Forum — Reduce Windows Boot Time: Disable Startup Apps & Optimize SSD
Windows Forum — Six Practical Ways to Speed Up Windows 11 Boot Time
Article Comments
Similar Articles
Articles Search
Sponsor
Featured Articles






Most Popular Articles









Article Categories


There are zero sub-categories in this parent category.
There are zero sub-categories in this parent category.


